Thursday, February 16, 2012

Toes in the sand

We got our very first measurable snowfall of the year on Monday morning.  I have been wanting snow all Winter and I just knew that it would wait until February or March to start snowing.  Now is the time that I get tired of the gray days and the cold weather.

So my Valentine's Day card for Jeff this year has a beach theme.  We LOVE our "toes in the sand" time together.


Recipe
Seashell 2 Digi Stamp from Shelly's Images
Beach Path Digi Stamp from Shelly's Images
Two Scoops patterned paper from Basic Grey
Flourish .svg from Shelly's Images
Free Branch .svg from SVG Cuts
Sentiment from Shelly's Images
Spellbinders Scallop Circle
Curvy Cutter Circle Cutter
Martha Stewart Punch

Copic Colors:  
  • Pavers  - C0, C1, C3, E50
  • Small pavers and rocks - E 57, E10 (a little), YR20, C1, C3, stipple with 0
  • Fence - C0, C3, B000, Copic White
  • Palm Tree - Trunk - W3, E51, C0, E55 Fronds - E55, G20, YG63, G24
  • Brush/Foliage - G29, YG63, G20
  • Sand - E50, Y21, do a little shadow with E35
  • Ocean - B97, B95, B93, B91, B000
  • Sky - R20, B000, B21
Bazzil Colors:
  • Sea Water
  • Blue (discontinued)
  • Parakeet
  • Walnut


Tuesday, February 14, 2012

Happy Valentine's Day!

I am busy cooking for our Valentine's Day supper, but I wanted to stop in really quick to wish everyone a wonderful Valentine's Day.  

Preparing holiday meals is one of the "Works of Heart" that I enjoy the most.  I love to cook.  And I especially love to bake.  So I thought I would share the recipe for this special Cherry Heart Cheesecake.  It is actually a sour cream cheesecake, which I think is soooo delicious.  And really very easy.


Here is the recipe...
*Crust:
33 graham cracker squares, crumbled (2 cups or a little less)
4 ounces (1 stick) unsalted butter, melted, plus additional, for brushing the pan
1 tablespoon sugar
*Filling:
20 ounces cream cheese
1 1/4 cups sour cream
1 cup sugar
1 tablespoon vanilla extract
2 eggs
3 yolks
1/3 cup heavy cream
*Topping:
8 ounces sour cream
2 tablespoons sugar
1 teaspoon vanilla
1 can cherry pie filling

Directions
*Preheat oven to 300 degrees F. Brush some of the melted butter around a 9 inch spring form pan.

*In a small bowl, combine crumbled graham crackers, the remaining melted butter, and 1 tablespoon of sugar. Press the mixture into the bottom of the pan. Bake for 10 minutes and allow to cool.

*In a mixer with a paddle attachment, beat sour cream for 10 seconds. Add the cream cheese and sugar and mix on low for 30 seconds and then turn up to medium. Scrape the bowl.

*In a separate container, combine vanilla, eggs, yolks, and heavy cream. With the mixer on medium, slowly pour the liquid mixture in. When half of it is incorporated, stop and scrape. Continue adding the mixture until the rest of the ingredients are incorporated. Once completely combined, pour into the cooled crust.

*Lower oven temperature to 250 degrees F. Place a large casserole dish of water onto the lower rack of the oven to act as your "water bath".  Place the cheesecake onto the upper shelf after the oven has had time to preheat and the water bath has gotten hot.  Bake in the oven for 1 1/2 hours.  Turn the oven off and open the door for one minute. Close the door for another half hour. Remove the cheesecake from the oven and place in the refrigerator for 6 hours to completely cool before serving.

*When ready to serve remove the springform sides of the pan.  Serve either on the flat part of the pan or run a knife along the bottom of the cheesecake to loosen.

*For topping, in a small bowl stir together sour cream, 2 tablespoons sugar and vanilla.
Spread evenly over the top of the cheesecake.  (stay 1/2 inch or so away from edge of cheesecake)  Drop teaspoonfuls of pie filling (without cherries) onto sour cream in a circular shape around edges of the topping.  Pull a knife or spatula through the sauce to form hearts.  Refrigerate.
To slice, place your knife into a hot water bath and wipe dry each time you make a pass through the cake.
Serve with the extra cherry pie filling if desired.

Ok....I better get back to the kitchen to finish dinner.  :)

Friday, February 10, 2012

Valentine Card Featuring "Beary Much Love"

I love this image!  "Beary" has become a "regular" on my sketchpad.  I am always thinking of different digi stamps to make with this cute bear.

This is a special Valentine's card for my brother.  He sent me the sweetest card earlier this week so I wanted to try to make something very special for him.


Recipe - 
Copic Colors:   Browns-E57, E35, E21, E33, and a little YR24
Tans: E21, YR20, E33
Reds and Pinks: R29 down to R20
Sentiment: Computer Printed
Heart Border: Made using Make the Cut and files from .svg cuts
Embossing Folders And Scor-Pal Embossing
Red Ribbon

Challenges to enter:
Alphabet Challenge Blog - A for Animals (Hopefully a Teddy Bear counts)
Card Makini Mama's - Valentine
Prairie Fairy Fridays - Let me call you sweetheart

Tuesday, February 7, 2012

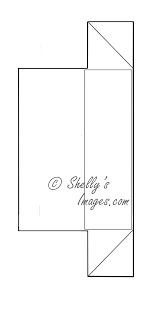
Collapsible Box Tutorial with free Template

Welcome to another Tuesday
Tutorial here at Shelly's Images.

Today we have a special video tutorial to share with you.  And we are even giving you the free templates for making the box.


Click this link if you have trouble viewing the embedded video:
http://www.youtube.com/watch?v=jkeSxAt6BPA&feature=youtu.be


Here is the download code for the .doc file.  Use this file if you plan to print and cut the template using Word.
I will also share the .jpg versions of the template.  Please be aware that sizes can change depending on the program you use and the way that you insert the file into each program.  I recommend printing a test copy on plain paper to make sure the measurements are all correct.


I hope you enjoyed the tutorial. And I really hope you will make some of these fun boxes.  If you do make some projects using the tutorial we would love to have you drop in and share them here.  Or enter them in some of our challenges.  If you have any questions at all about our tutorial please post a comment here.  Be sure to leave us a little note if you grabbed the templates.  :)

Challenges to enter:
The Cheerful Stamp Pad - Romance is in the Air
Crafty Boots - Valentines
Die Cut Creams - Pink, Red and Heart
Ooh La La Challenge - Be My Valentine
Paper Pretties - Red, Pink and White
Stamps R Us - Valentine/Love
Victorine Stamps - Love/Valentines


Valentine Wreath

I wanted to share this beautiful wreath that my daughter Meghann made for me.

It is amazing how pretty a foam wreath (in this case a heart shaped wreath), felt circles, a pretty ribbon, and a jillion pins can be when they are combined.

It looks like she folded each felt circle in half and then in half again.  And then pinned that point to the wreath. 

It looks so pretty on our front door.  
Thank you so much Meghann!  I love you so much!