Thursday, November 1, 2012

Leaves, Leaves....E-V-E-R-Y-WHERE!

Well, our yearly leaf battle has begun. 
I am happy to report that the score is...
Parker's  - 4
Leaves - 0

But if the arrival of Fall is announced by falling leaves then Fall has definitely arrived here in Kansas.

This week I made a Squash Fold tutorial for the blog at Shelly's Images.  You can find my tutorial here.  Here is my finished project.


**Details**
For the card base
This card is made to fit a 6 x 6 envelope
The card base measures 12 x 12 using Yam Bazzill cardstock
Score according to the tutorial here.  For my project I also folded over the front square which shows off the folds on the inside.

The triangle pieces are cut from 5 3/4 x 5 3/4 square patterned paper which is then cut in half diagonally.  

Image
Fall Leaves Digi Stamp from Shelly's Images.com
Pumpkin from Fall Friends Set from Shelly's Images.com

Copic Colors
Fence, Rake, and Dirt - E50, E51, E53, E33, E55, YR24, E39, E25, E59
Leaves and Pumpkin - G20, YG17, YG67, R24, YR12, Y02, YR16, YR68, YR15, YR18, BV11

I hope you enjoyed my project.  Please be sure to stop by Shelly's Images blog to see all of the other great projects from our wonderful Design Team.

Thursday, October 4, 2012

A scary invitation

Well, I don't ordinarily enjoy scary or creepy images.  But the idea for this digi stamp has been on my mind since last Halloween.  This year I finally got it sketched out and it really was fun to create with.  


Shelly's Images "Grave Invitation" set comes with several files to give you lots of designing options.  For my card I chose to use the "Dare" version.  Be sure to stop by Shelly's Images Blog to see the creations by the other talented DT members.  And we hope you will enter a project for our challenge which begins today.  We have a super fun "Tic Tac Toe" challenge.  My project uses a punch or die, ribbon, and the free space.


**Details**
For the card base
This card is made to fit an A6 envelope.
The card base measures 9" wide by 6 1/4" tall from black cardstock
Score at 2 1/4 and 6 3/4
The gate measures 4 1/2 wide
I cut the gate on the blackout setting for the patterned paper behind the gate.
The sentiment is printed and then cut out with Spellbinders Romantic Rectangles 
(2nd from smallest size and then cut again to reduce the size a little more.)

Image
Grave Invitation Set from Shelly's Images.com

Copic Colors
Dirt - E53, E57, W3, W7
Hand - G20, YG11, G21
Fingernails - E53, G20, YG11, W3, W7
Headstone Design - R20, R14, R24, R27
Headstone Border - V12, V15, V06, V09
Headstone - W1, W3, W6
Sign in Hand - E50, Y21, YR31, Y17
Grass - G21, YG63, YG67


Thursday, September 6, 2012

One down....

...and lots to go.  I'm talking about Christmas cards of course :)  I would like to say that I have a good head start on my cards for this Christmas, but that would be a fib.  At least I do have a prototype done.  Which is sometimes the hardest part.  

This year I decided to try a squash fold card.  This style card is generally made in either a 5 x 5 or 6 x 6 inch format.  Keep in mind the square cards are more expensive to send.  :(  For my cards this year I am using the newest Shelly's Images digi stamp called "One Last Stop".  I used the Shelly's Images stamp called "Pine" for the inside of my card.


A view of the open card

I will have a tutorial for making the squash card and more details on coloring this amazing image.  

Tuesday, June 12, 2012

Special Birthday Parties

I have been so busy the last few weeks planning parties for two very special people in my life.  

My husband Jeff turned 50 on May 25th so I wanted to do something very special for him.  He didn't want a big extravagant party, but I tried very hard to surprise him with a special surprise birthday dinner with some very special friends.  I found out a few things while trying to plan a surprise party.  1. It is ALOT of work!  I am terrible at keeping secrets.  2. My husband is nearly impossible to surprise.  It is funny how he doesn't seem to notice alot of things....until you don't want him to notice.  And 3. It is sooooo disappointing when the surprise   is discovered.  
We had an amazing dinner anyway and very much enjoyed our special friends.  This is the cake that I made for the party.


The bottom layer is 2 layers of 10 inch cakes and the top layer is 2 layers of 6 inch cake.  All of the decorations are molded from fondant other than the paper umbrella.  The sand is brown sugar and the birds are painted on with just black Wilton cake coloring.  

We also had a birthday party for our oldest daughter Meghann this last weekend.  She turned 22 on June 9th but we had a little pool party and grilled hamburgers and hot dogs on Sunday.  It was very windy but a fun day at the pool.  Meghann and her boyfriend are leaving on a vacation very soon so I thought this "Flip Flop Cake" would be nice for her birthday.

I used the 10 inch pan again to make a 2 layer cake.  And again hand molded and cut all of the decorations from fondant.  This time I used raw sugar for the sand.  Which I think I like a bit better than the brown sugar.

It is such fun to make special cakes for birthday celebrations.  I hope you enjoyed seeing these two special cakes.  

Thursday, June 7, 2012

Butterfly Z fold Card

I had so much fun creating this project with the "Butterfly Set" digi stamp from Shelly's Images.  Would it be bad to say how much I love this stamp!  Ok, I am probably partial since I drew and designed the stamp.  But some stamps just have a more special place in my heart and this is definitely one of those.


The card is a z fold card that I designed to fit in an A2 size envelope.  
Image Used - Butterfly Set 
Here are the measurements...
Card Base - 12 x 5 1/2
Folded Size - 4 x 5 1/2
Envelope Size - A2 4 3/8 x 5 3/4
Score at - 2, 4, 8, 10 (mountain, valley, valley, mountain)
Side Pieces - outer 1 7/8 x 5 3/8 and inner 1 5/8 x 5 1/8
Inside Mat - outer 3 7/8 x 5 3/8 and inner 3 5/8 x 5 1/8
Image - Butterfly printed on 3 3/4 x 4 1/4 paper and then matted

Other information
the blue paper is Bazzill Sea Water
the purple paper is Bazzill Purple Sage
the patterned paper is from My Minds Eye - Bohemia collection
ribbon and gems from my stash

Copic Colors
for trellis - W1 through W9
for tall phlox flowers - R81, V12, V15, V17
for leaves - G20, G21, YG17, E35
for butterfly - Y17, R35, BV02, B000, B02, B05, W1 through 9, 0, and white pen

The Design Team at Shelly's Images have done some fabulous projects that you really should see.  Be sure to stop by the blog to take a look.  And don't forget to visit the store and grab this special image.  It is available today only at a special sale price.

Tuesday, May 15, 2012

Tulips

This is our first ever "Invisible Line" digi at Shelly's Images.  And I just love the soft look that this technique gives to the stamp.

I have created a video tutorial with all of the specifics on how I created this card.  The diamond fold cards are so pretty and dramatic.  


Thanks for visiting today.  :)

Monday, May 14, 2012

I actually did it!

Really, truly.  I really did!  I completed a couple of scrapbook pages!!!!!!
It seems like ages since I have done a scrapbook page.  And boy oh boy is it hard after making so many cards!  It wouldn't seem like such a difficult thing to do but for some reason I seem to have completely forgotten how to do a scrapbook page.  And I have a jillion pictures to scrapbook so I better get back into the swing of layouts!

Scrapbooking was my first love and the reason I even got into paper crafting.  And it does feel a little like "coming home" when I sit down and work on pages.  And I love to remember the special times in the photos.  

The first layout is pictures of my youngest daughter feeding our chickens.  I MISS having a chicken house so much.  I just love the look on her face in the middle picture.  I remember how tickled she was that the chickens were so hungry and coming right up to her.  

Hen Digi Stamp from Shelly's Images
Copic Colors: 
Wattle and Comb-R29, R20, R14
Beak-YR24, YR15
Face-R20, E53
Body-Y21, YR24, E57, E53, YR12
Eggs-BG10, BG000, 0 - E50, E33 - R20, E33

The second layout is of our son and his baseball team.  We have been to so many games for our children.  And I am always so proud of my children when I sit and watch them play the games they love.  Although I have to say that there have been so many close games and hours of sitting on the edge of my seat during the championship game.

Baseball Glove digi stamp from Shelly's Images
Copic Colors:
E57, E08, E35, E53, Y21, YR24
Laces-W5, W7, W9

Now to find a little more time in our crazy schedules to do more scrapbook pages.  :)

Sunday, May 13, 2012

A Good Witch

Here is yet another card from the set I have been working on for a friend. 

This is SUCH a fun image to work with.  And she sure turned out cute on this partial front card.  


Card Measurements from Tutorial. (I made the A7 size)
Patterned Papers from my stash
Bazzill Papers- African Violet and Raven
Stickles for the hat, waist, and broom
Good Witch Digi Stamp from Shelly's Images

Copic Colors:
Skin-E000, E51, E21
Fence and Broom-E53, E25, E29, E35, E21, YR24, E57, Y21
Hair-YR24, Y21, YR20
Grass-G28, YG17, YG11, 
Dirt-E35
Green in Skirt and Hat- G20, YG06, YG11
Sky- B91, B93, C0

Saturday, May 12, 2012

Christmas in May?

Ok...so it did feel a little odd to be making a Christmas card in May.  It is hard to even think about Christmas when we are enjoying such nice weather outside.  But, as I said yesterday, I have been working on a set of cards for a friend and wanted to send her cards for many different occasions.  

And, I will admit that I am addicted to these partial front cards.  They really turn out so pretty, and they are super easy and fast.  If you didn't see the tutorial at the Shelly's Images Blog you can find it here.


Card Measurements - Found in the Tutorial (I made the A7 size)
Santa Digi Stamp from Shelly's Images
Patterned Papers from my stash
Bazzill Papers - Crimson and Aspen
Ribbon and sequins from my stash
Gold Stickles, Liquid Pearl for Santa's beard, Crystal Accents and glitter for the "snow" on Santa's hat, and Crystal Accents for the lenses in Santa's Glasses.

Copic Colors used:
Skin-E000, E51, E21, touch of R30 for cheeks
Reds-R29, R27, R24, R14
Gray for Beard-C3, C0
Blue for eyes-B91
Yellow for bell-YR12, Y21

It really isn't too early to start making some Christmas cards for your stash.  I HOPE to get a very early start this year.  ;)

Friday, May 11, 2012

Birthday Double Dutch Card

I have been hard at work this week creating a set of cards for a friend.  So I have lots of different things to share.  :)

This card is a really fun double dutch card using Shelly's Images "1st Birthday" digi stamp.

This card was made to fit an A2 size envelope.

Measurements:
Card base measures 9" x 4 3/16" 
Score at 5 1/2 inches along the 9" side
Card bottom measures 8 1/2" x 2"
Score bottom at 2 1/8" and 6 3/8" along the 8 1/2" side
Place adhesive in the middle section of this base and adhere to the bottom of the card.
This forms the little wrap around at the bottom of the card.

Other information:
Patterned paper, ribbons, and sequins from my stash
Button from Aunt Minnie's button jar :)
Image: Shelly's Images 1st Birthday
Printed 3 times and paper pieced for the plate
Sentiment: Shelly's Images
Spellbinders die

Copic colors used:
Cake-Y21, Y17, YR24
Frosting-R35, R30, R32
Colorless blender

I hope you will try this fun card style.  


Monday, April 23, 2012

Sunday Supper

Hi everyone!
First I have to say that we have been having ALOT of fish and seafood for dinner!  Recently a new store opened in town called Seafood Thyme.  And we have had some of the best fish ever from their fresh fish market.
This weekend we grilled some Chilean Sea Bass.  My husband and I love to go to Kona Grill at the Plaza in Kansas City and one of our favorite dishes there is the Chilean Sea Bass.  So we had a standard that we were hoping we could achieve at home.  And WOW!  Did it ever.  This fish is so amazingly delicious.  You have to try it. 
Here is how we made our Chilean Sea Bass.
 First drizzle the sea bass with soy sauce and allow it to marinate skin side up for 5 to 10 minutes.
 Then turn the fish skin side down and lightly sprinkle with salt and pepper.  Not much salt since the soy has so much sodium.  
 Preheat the grill on low and then place the fish skin side down on the grill.
 After about 10 or 12 minutes the skin is completely charred and the fish has loosened and separated.  
 Test by lightly pressing on the side of the fish.  You can see how it easily pushes off of the skin.

 Oh YUM!  Perfect.
 Use the spatula to clean the grill.  Just roll the skin up and discard.
We like to serve our sea bass with a small cup of soy sauce.  And last night we also served it with spinach fried rice.  Actually...it started out being just plain fried rice and then we found some left over fresh spinach in the refrigerator and decided to add it at the last minute.  Dinner was amazingly delicious.  And even better than the Kona Grill.  Which is certainly an accomplishment.


Monday, April 9, 2012

Easter 2012

Happy Easter!

We had a spectacular Easter so I thought I would share a few of our traditions (both old and new) with everyone.

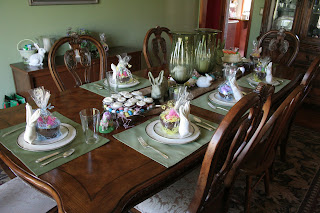
One of the new items for this Easter were these cute chocolate bowls filled with Easter candy.  I used these for each place setting at the table.  And also sent a larger basket to our neighbors.  They turned out SO cute, but one small warning...they melt very easily.  Next time I will use a quality chocolate rather than the chocolate bark. 

Here is one of the place settings.  I folded the bunny napkins which turned out so cute.  (Another Pinterest find.)
And the whole table.

Even our pets seem to get involved with the holiday preparations.  Claire loves to "help" decorate eggs.  She also loves to roll them off of the dining room table where they are displayed.

The dogs love to chase and bite open the plastic eggs.  I will be finding plastic eggs around the house for quite some time I think.

Each year at Easter I make a Carrot Cake.  I love decorating the top with the colorful carrots.  

For our Easter Egg Hunt this year we changed our tradition a bit.  In the past we have hidden eggs with coupons inside.  The coupons would be for things like "have Mom make your bed" or "rent a movie".  With only Taylor at home now the coupons don't work so well any longer.  So this year we hid eggs with letters inside of them.  The kids hunted for their egg color until they found all 5.  Then they brought their eggs inside and began to unscramble the letters to spell out a word associated with Easter.  

Here is Taylor beginning her unscrambling. 

hmmm....nope...Stop Hiliry isn't the secret code word.  
There ya go!

Our niece Michaela joined us for Easter and enjoyed the egg hunt. 
Nope...wrong again.  Michaela's word was Almighty.
Our daughter Jordan had lots of letters.  Her word was Resurrection.
Our oldest daughter Meghann and her boyfriend Zach seemed to enjoy the hunt.  Zach solved the unscramble with something like 4 letters. 
Once everyone had their secret words they got an envelope with some money.  
It was a really, really amazing day!

I hope you enjoyed a few of our Easter traditions.  I know that many lasting memories were made during this special day.

Should I share my Carrot Cake Recipe? 

Carrot Cake


  • Ingredients 

    • 4 eggs
    • 1 1/2 cups vegetable oil
    • 1 1/2 cups sugar
    • 2 cups all purpose flour
    • 2 teaspoons baking soda
    • 1/2 teaspoon salt
    • 2 teaspoons cinnamon
    • 2 1/2 cups shredded carrots
  • Instructions 

    1. Preheat oven to 350 degrees. Combine eggs, oil, and sugar in large bowl; mix well. Add flour, baking soda, salt, and cinnamon. Mix just until moist. Fold in carrots. Spread in greased and floured round cake pans. Bake for 40 to 45 minutes (less for smaller pans) or until cake tests done. Let cool completely. Frost with Cream Cheese icing.
    2. Notes 

      1 recipe = 2 8 inch cakes 
      2 recipes = 2 10 inch cakes
       2 recipes = 2 9 inch cakes and 12 cupcakes

Cream Cheese Icing


  • Ingredients 

    • 1 cup (2 sticks) butter, softened
    • 2 packages (8 oz. each) cream cheese, softened
    • 8 cups sifted confectioners' sugar (about 2 lbs.)
    • 2 tablespoons milk
    • About 5 1/2 cups of icing.
  • Instructions

    1. Step 1 In medium mixer bowl, cream butter and cream cheese together until smooth. Add sugar one cup at a time and milk. Mix well. Beat on high until smooth (only 30 seconds to 1 minute). Thin to ice cake smooth; use full strength for piping borders. 
    2. Step 2 NOTE: Do not use light cream cheese or butter substitute. If margarine is used, icing will be softer.


Friday, March 16, 2012

Thursday Dinner Challenge

Well, life has been a little crazy this week.  So Darlene and I weren't able to Skype while we cooked dinner last night.  But that didn't stop us from making the recipe that we decided on earlier in the week.  Click here to visit Darlene's post about her chicken dinner. 

This week Darlene chose our menu and she shared her Chicken Roll-Ups Recipe.

Thanks so much for the recipe Darlene.  Supper was DELICIOUS.  The chicken was amazingly moist and tender.  Although I do have a confession to make.  The recipe called for Zesty Italian Dressing which I knew I had in the pantry.  Small problem.  It expired in November of 2011.  So....now what?  I had a hungry family to feed and no time to run to the store.  So after searching through the refrigerator and cabinets I decided to use Caesar dressing.  It was wonderful.  Of course I didn't confess to the family until after they all tried it and loved it.  
In the future I might try adding some fresh cooked spinach.  Or even some steamed asparagus rolled into the chicken would probably be delicious.  But it sure doesn't need anything.  It is delicious just as it is.
Here is the recipe for  Chicken Roll Ups
  • 2 boneless, skinless chicken breasts (I doubled the recipe)
  • Mozzarella Cheese (sticks or shredded) (I bought a block of Mozzarella and cut it)
  • Red Pepper Flakes (nope...no red pepper flakes either.  I sprinkled a little cayenne pepper)
  • Zesty Italian Dressing (Delicious with the Caesar Dressing I used)
  • Italian Bread Crumbs (aha...finally an ingredient I actually had)
  • 2 paper plates 
  • 2 sheets of waxed paper
  • meat pounder 
  • Instructions
    1. Cut your chicken breast in half 'longwise' to make 2 'thinner' pieces from each breast.
    2. Between waxed paper, pound your chicken breasts to make thinner.
    3. Sprinkle chicken 'lightly' with pepper flakes, place cheese at one end and roll up.
    4. Dredge first in Italian Dressing ... then in breadcrumbs
    5. Place on foiled baking sheet - sprayed with Pam
    6. Bake in 350 degree oven for 20-30 minutes.
    7. Darlene will be out of town next week so no Skype crafting or cooking.  :(  I guess the good news is that I have two weeks to pick a great recipe for our dinner challenge.  The pressure is on.